Lvs+keepalived集群生产实战模拟
1. LVS+keepalived介绍
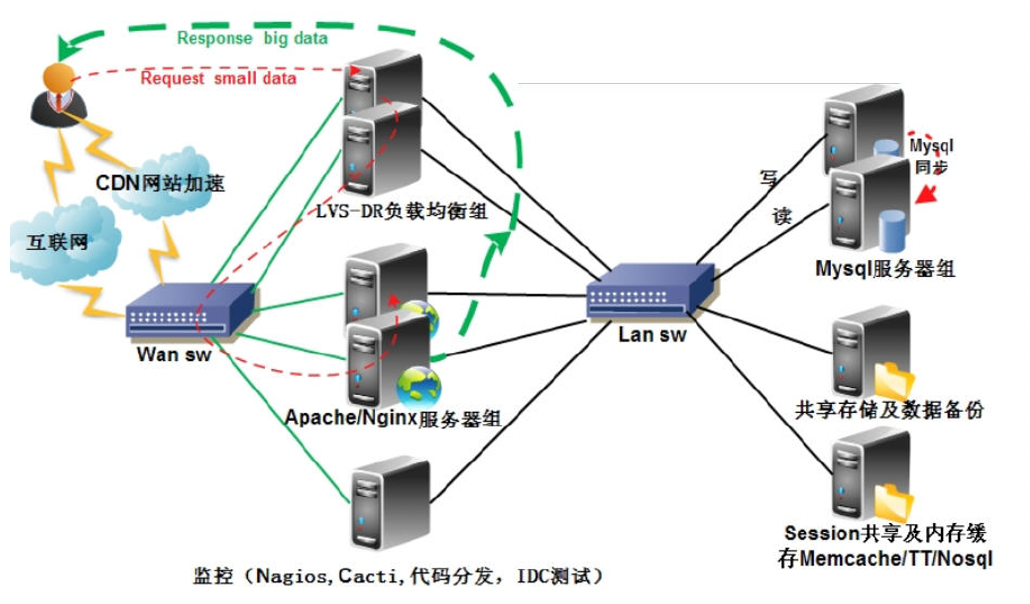
2. 负载均衡方案拓扑图
2.1. 系统架构拓扑图
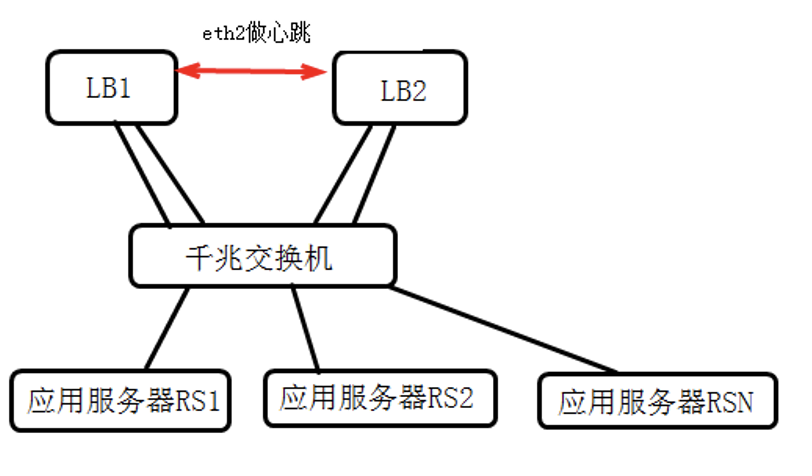
2.2. 部署详细拓扑图
| LB负载均衡服务器1 | LB负载均衡服务器2 |
|---|---|
| eth0:0 vip 200.166.188.112 | |
| eth0 200.166.188.107 | eth0 200.166.188.106 |
| eth2 192.168.19.107 | eth2 192.168.19.106 |
| eth1 192.168.1.107 | eth1 192.168.1.106 |
| 通过eth2做心跳线 | |
 |
3. 网卡,ip等资源列表
3.1. 硬件:DELL R710 (两台标配)
3.2. 系统:centos 5.5 64bit
3.3. ip信息列表

提示:内外网IP分配可采用最后8位相同的方式,这样便于管理
4. 安装lvs和keepalived软件包
4.1. 下载相关软件包
mkdir -p /root/tools
cd /root/tools
wget http://www.linuxvirtualserver.org/software/kernel-2.6/ipvsadm-1.24.tar.gz
wget http://www.keepalived.org/software/keepalived-1.1.17.tar.gz
4.2. 安装
4.2.1. 安装LVS命令
lsmod | grep ip_vs
cat /etc/redhat-release
uname -r
ln -s /usr/src/kernels/2.6.18-238.el5-i686/ /usr/src/linux

tar zxf ipvsadm-1.24.tar.gz
cd ipvsadm-1.24
make && make install
lsmod | grep ip_vs
/sbin/ipvsadm
lsmod | grep ip_vs

提示:
此时ipvs模块还没有被加载,可以执行ipvsadm或modprobe ip_vs命令把ip_vs加载到系统内核 ,然后再lsmod | grep ip_vs应该看见ip_vs模块被列出。

注意:
(1)	ln命令的路径要和uname -r输出结果内核版本对应
(2)	如果没有/usr/src/kernels/2.6.18-238.el5-i686,是因为缺少kernel-devel…软件包,可通过yum install kernel-devel -y安装。
(3)	ln这个命令也可以不执行,直接指定内核参数编译即可。
4.2.2. 安装Keepalived
提示:安装前请确认路径: --with-kernel-dir=/usr/src/kernels/2.6.18-238.el5-i686 方法一:
ln -s /usr/src/kernels/2.6.18-238.el5-i686 /usr/src/linux
#如果没有/usr/src/kernels/2.6.18-238.el5-i686,是因为缺少kernel-devel…软件包,可通过yum install kernel-devel -y安装。
tar zxf keepalived-1.1.17.tar.gz
cd  keepalived-1.1.17
./configure
make && make install
方法二:
tar zxf keepalived-1.1.17.tar.gz
cd  keepalived-1.1.17
./configure \
--with-kernel-dir=/usr/src/kernels/2.6.18-238.el5-i686
make && make install
4.2.3. 配置keepalived规范启动
/bin/cp /usr/local/etc/rc.d/init.d/keepalived /etc/init.d/  #生成启动命令
/bin/cp /usr/local/etc/sysconfig/keepalived /etc/sysconfig/
mkdir /etc/keepalived #创建默认的配置文件路径
/bin/cp /usr/local/etc/keepalived/keepalived.conf /etc/keepalived/
#把keepalived.conf拷贝到/etc/keepalived下

/bin/cp /usr/local/sbin/keepalived /usr/sbin/
/etc/init.d/keepalived start #或/etc/init.d/keepalived stop
4.3. 常规rpm包安装时的启动方式
5. 配置转发和防火墙
5.1. 开启linux内核转发功能
#开启linux转发开关
sed -i 's#net.ipv4.ip_forward = 0#net.ipv4.ip_forward = 1#' /etc/sysctl.conf

#使上面设置生效
sysctl -p
#提示:对于DR模式不需要开启linux转发,此处为了兼容NAT模式的部署增加。
6. 配置keepalived实现lvs负载均衡
6.1. LVS NAT/DR模式配置参数说明
from: http://www.keepalived.org/LVS-NAT-Keepalived-HOWTO.html
-- cut here --
! This is a comment
! Configuration File for keepalived

global_defs {
   ! this is who emails will go to on alerts
   notification_email {
        admins@example.com
    fakepager@example.com
    ! add a few more email addresses here if you would like
   }
   notification_email_from admins@example.com

   ! I use the local machine to relay mail
   smtp_server 127.0.0.1
   smtp_connect_timeout 30

   ! each load balancer should have a different ID
   ! this will be used in SMTP alerts, so you should make
   ! each router easily identifiable
   lvs_id LVS_EXAMPLE_01
}

! vrrp_sync_groups make sure that several router instances
! stay together on a failure - a good example of this is
! that the external interface on one router fails and the backup server
! takes over, you want the internal interface on the failed server
! to failover as well, otherwise nothing will work.
! you can have as many vrrp_sync_group blocks as you want.
vrrp_sync_group VG1 {
   group {
      VI_1
      VI_GATEWAY
   }
}

! each interface needs at least one vrrp_instance
! each vrrp_instance is a group of VIPs that are logically grouped
! together
! you can have as many vrrp_instaces as you want

vrrp_instance VI_1 {
        state MASTER
        interface eth0

        lvs_sync_daemon_inteface eth0

    ! each virtual router id must be unique per instance name!
        virtual_router_id 51

    ! MASTER and BACKUP state are determined by the priority
    ! even if you specify MASTER as the state, the state will
    ! be voted on by priority (so if your state is MASTER but your
    ! priority is lower than the router with BACKUP, you will lose
    ! the MASTER state)
    ! I make it a habit to set priorities at least 50 points apart
    ! note that a lower number is lesser priority - lower gets less vote
        priority 150

    ! how often should we vote, in seconds?
        advert_int 1

    ! send an alert when this instance changes state from MASTER to BACKUP
        smtp_alert

    ! this authentication is for syncing between failover servers
    ! keepalived supports PASS, which is simple password
    ! authentication
    ! or AH, which is the IPSec authentication header.
    ! I don't use AH
    ! yet as many people have reported problems with it
        authentication {
                auth_type PASS
                auth_pass example
        }

    ! these are the IP addresses that keepalived will setup on this
    ! machine. Later in the config we will specify which real
        ! servers  are behind these IPs
    ! without this block, keepalived will not setup and takedown the
    ! any IP addresses

        virtual_ipaddress {
                192.168.1.11
        ! and more if you want them
        }
}

! now I setup the instance that the real servers will use as a default
! gateway
! most of the config is the same as above, but on a different interface

vrrp_instance VI_GATEWAY {
        state MASTER
        interface eth1
        lvs_sync_daemon_inteface eth1
        virtual_router_id 52
        priority 150
        advert_int 1
        smtp_alert
        authentication {
                auth_type PASS
                auth_pass example
        }
        virtual_ipaddress {
                10.20.40.1
        }
}

! now we setup more information about are virtual server
! we are just setting up one for now, listening on port 22 for ssh
! requests.

! notice we do not setup a virtual_server block for the 10.20.40.1
! address in the VI_GATEWAY instance. That's because we are doing NAT
! on that IP, and nothing else.

virtual_server 192.168.1.11 22 {
    delay_loop 6

    ! use round-robin as a load balancing algorithm
    lb_algo rr

    ! we are doing NAT
    lb_kind NAT
    nat_mask 255.255.255.0

    protocol TCP

    ! there can be as many real_server blocks as you need

    real_server 10.20.40.10 22 {

    ! if we used weighted round-robin or a similar lb algo,
    ! we include the weight of this server

        weight 1

    ! here is a health checker for this server.
    ! we could use a custom script here (see the keepalived docs)
    ! but we will just make sure we can do a vanilla tcp connect()
    ! on port 22
    ! if it fails, we will pull this realserver out of the pool
    ! and send email about the removal
        TCP_CHECK {
                connect_timeout 3
        connect_port 22
        }
    }
}

! that's all

-- cut here --
6.2. DR模式主从master及backup机器keepalived配置对比
master配置文件路径为/etc/keepalived/keepalived.conf
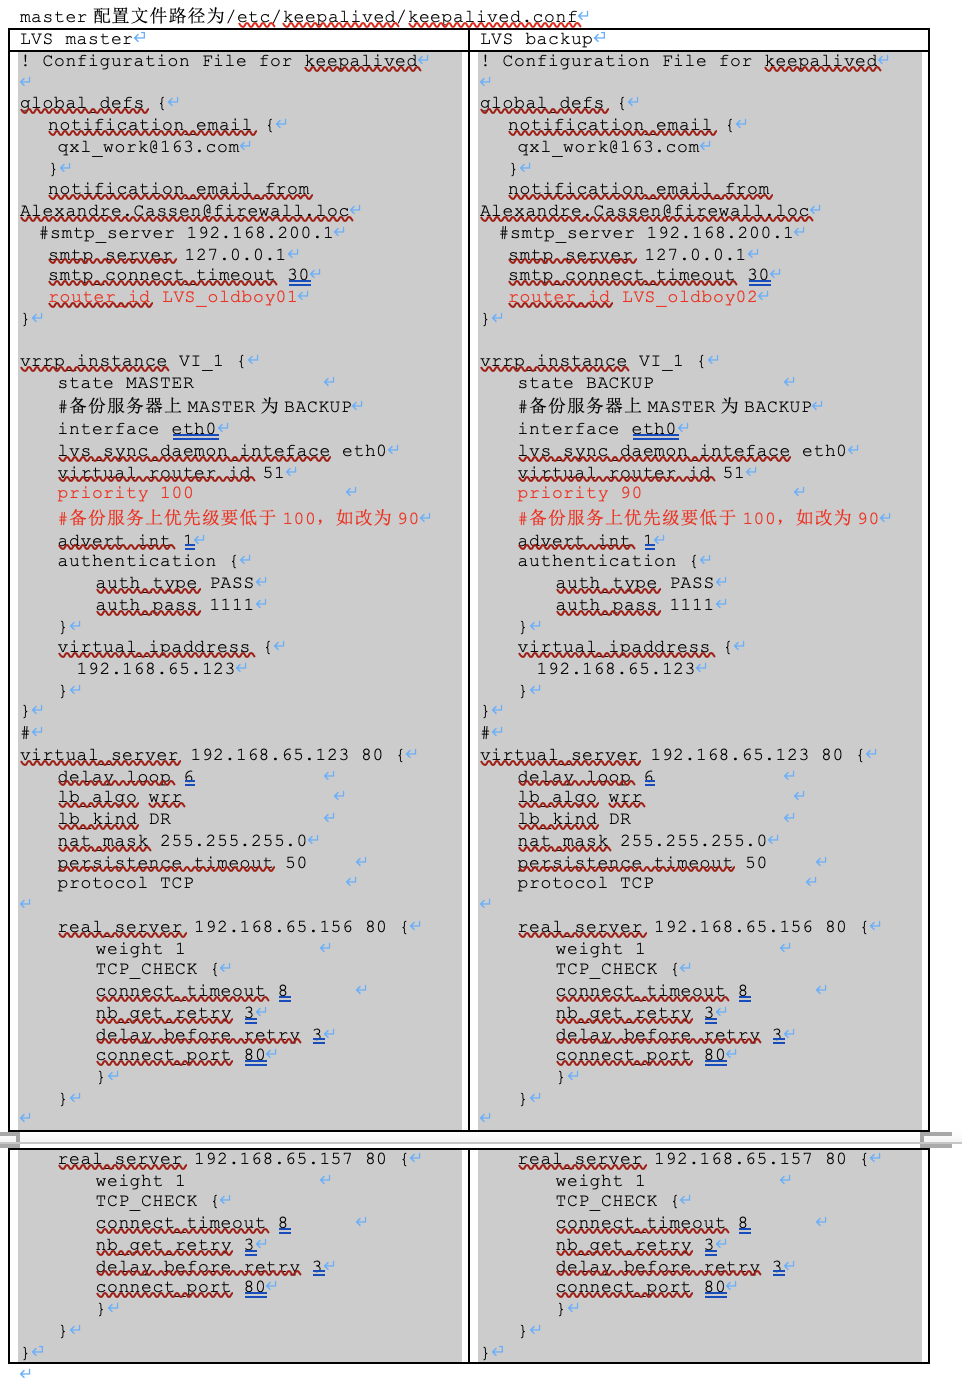
LVS master
! Configuration File for keepalived

global_defs {
   notification_email {
	qxl_work@163.com
   }
   notification_email_from Alexandre.Cassen@firewall.loc
  #smtp_server 192.168.200.1
   smtp_server 127.0.0.1
   smtp_connect_timeout 30
   router_id LVS_oldboy01
}

vrrp_instance VI_1 {
state MASTER
#备份服务器上MASTER为BACKUP
    interface eth0
    lvs_sync_daemon_inteface eth0
    virtual_router_id 51
priority 100
#备份服务上优先级要低于100,如改为90
    advert_int 1
    authentication {
        auth_type PASS
        auth_pass 1111
    }
    virtual_ipaddress {
      192.168.65.123
    }
}
#
virtual_server 192.168.65.123 80 {
    delay_loop 6
    lb_algo wrr
    lb_kind DR
    nat_mask 255.255.255.0
    persistence_timeout 50
    protocol TCP

    real_server 192.168.65.156 80 {
        weight 1
        TCP_CHECK {
        connect_timeout 8
        nb_get_retry 3
        delay_before_retry 3
        connect_port 80
        }
    }

    real_server 192.168.65.157 80 {
        weight 1
        TCP_CHECK {
        connect_timeout 8
        nb_get_retry 3
        delay_before_retry 3
        connect_port 80
        }
    }
}
LVS backup
! Configuration File for keepalived

global_defs {
   notification_email {
	qxl_work@163.com
   }
   notification_email_from Alexandre.Cassen@firewall.loc
  #smtp_server 192.168.200.1
   smtp_server 127.0.0.1
   smtp_connect_timeout 30
   router_id LVS_oldboy02
}

vrrp_instance VI_1 {
state BACKUP
#备份服务器上MASTER为BACKUP
    interface eth0
    lvs_sync_daemon_inteface eth0
    virtual_router_id 51
priority 90
#备份服务上优先级要低于100,如改为90
    advert_int 1
    authentication {
        auth_type PASS
        auth_pass 1111
    }
    virtual_ipaddress {
      192.168.65.123
    }
}
#
virtual_server 192.168.65.123 80 {
    delay_loop 6
    lb_algo wrr
    lb_kind DR
    nat_mask 255.255.255.0
    persistence_timeout 50
    protocol TCP

    real_server 192.168.65.156 80 {
        weight 1
        TCP_CHECK {
        connect_timeout 8
        nb_get_retry 3
        delay_before_retry 3
        connect_port 80
        }
    }

    real_server 192.168.65.157 80 {
        weight 1
        TCP_CHECK {
        connect_timeout 8
        nb_get_retry 3
        delay_before_retry 3
        connect_port 80
        }
    }
}
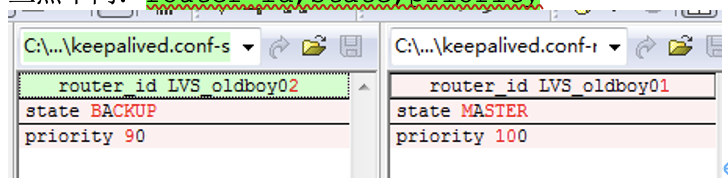
6.3. master及backup配置对比
三点不同:router_id,state,priority
6.4. 启动keepalived服务
/etc/init.d/keepalived start
#启动服务

#查看keepalived进程
[root@lvs1 keepalived]# ip add | grep 123
inet 192.168.65.123/32 scope global eth0
[root@lvs1 keepalived]# ipvsadm -L -n
IP Virtual Server version 1.2.1 (size=4096)
Prot LocalAddress:Port Scheduler Flags
-> RemoteAddress:Port           Forward Weight ActiveConn InActConn
TCP  192.168.65.123:80 wrr persistent 50
-> 192.168.65.157:80            Route   1      0          0
-> 192.168.65.156:80            Route   1      0          0
[root@lvs1 keepalived]# ipvsadm -L -n --stats
IP Virtual Server version 1.2.1 (size=4096)
Prot LocalAddress:Port               Conns   InPkts  OutPkts  InBytes OutBytes
-> RemoteAddress:Port
TCP  192.168.65.123:80                   0        0        0        0        0
-> 192.168.65.157:80                   0        0        0        0        0
-> 192.168.65.156:80                   0        0        0        0        0
7. RS端部署
7.1. RS配置VIP,并执行ipvs脚本
执行ipvs脚本ipvs_client,完成所有客户端的部署
#!/bin/bash
# description: Config realserver lo and apply noarp
VIP=(
        192.168.65.123
     )

. /etc/rc.d/init.d/functions

case "$1" in
start)
        for ((i=0; i<`echo ${#VIP[*]}`; i++))
        do
           interface="lo:`echo ${VIP[$i]}|awk -F . '{print $4}'`"
           /sbin/ifconfig $interface ${VIP[$i]} broadcast ${VIP[$i]} netmask 255.255.255.255 up
        done
        echo "1" >/proc/sys/net/ipv4/conf/lo/arp_ignore
        echo "2" >/proc/sys/net/ipv4/conf/lo/arp_announce
        echo "1" >/proc/sys/net/ipv4/conf/all/arp_ignore
        echo "2" >/proc/sys/net/ipv4/conf/all/arp_announce
	    action "Start LVS of RearServer.by old1boy"
        ;;
stop)
        for ((i=0; i<`echo ${#VIP[*]}`; i++))
        do
            interface="lo:`echo ${VIP[$i]}|awk -F . '{print $4}'`"
            /sbin/ifconfig $interface ${VIP[$i]} broadcast ${VIP[$i]} netmask 255.255.255.255 down
        done
        echo "0" >/proc/sys/net/ipv4/conf/lo/arp_ignore
        echo "0" >/proc/sys/net/ipv4/conf/lo/arp_announce
        echo "0" >/proc/sys/net/ipv4/conf/all/arp_ignore
        echo "0" >/proc/sys/net/ipv4/conf/all/arp_announce
	    action "Close LVS of RearServer.by old2boy"
        ;;
*)
        echo "Usage: $0 {start|stop}"
        exit 1
esac
7.2. ipvs脚本说明
7.3. arp抑制参数说明
arp抑制技术参数说明
中文说明:
arp_ignore- INTEGER
定义对目标地址为本地IP的ARP询问不同的应答模式
0 -(默认值): 回应任何网络接口上对任何本地IP地址的arp查询请求。
1 -只回答目标IP地址是来访网络接口本地地址的ARP查询请求。
2 -只回答目标IP地址是来访网络接口本地地址的ARP查询请求,且来访IP必须在该网络接口的子网段内。
3 -不回应该网络界面的arp请求,而只对设置的唯一和连接地址做出回应。
4-7 -保留未使用。
8 -不回应所有(本地地址)的arp查询。


arp_announce - INTEGER
对网络接口上,本地IP地址的发出的,ARP回应,作出相应级别的限制:
确定不同程度的限制,宣布对来自本地源IP地址发出Arp请求的接口
0 -(默认) 在任意网络接口(eth0,eth1,lo)上的任何本地地址
1 -尽量避免不在该网络接口子网段的本地地址做出arp回应. 当发起ARP请求的源IP地址是被设置应该经由路由达到此网络接口的时候很有用.此时会检查来访IP是否为所有接口上的子网段内ip之一。如果该来访IP不属于各个网络接口上的子网段内,那么将采用级别2的方式来进行处理.
2 -对查询目标使用最适当的本地地址.在此模式下将忽略这个IP数据包的源地址并尝试选择与能与该地址通信的本地地址.首要是选择所有的网络接口的子网中外出访问子网中包含该目标IP地址的本地地址. 如果没有合适的地址被发现,将选择当前的发送网络接口或其他的有可能接受到该ARP回应的网络接口来进行发送.限制了使用本地的vip地址作为优先的网络接口
8. 参考资料
9. 有关生产环境的配置说明
  (1)	在生产环境中,一般会部署双主同时服务互为主从模式。这样可满足高可用,高性能,高负载的需求;
  (2)	对流量不特别大的网站可采用本例的单主模式
  (3)	对于流量特别大的网站(2000万pv以上),除了采用双主模式外,iptables防火墙的开放会影响网站性能。此时可考虑关闭防火墙或采用硬件防火墙。
10. keepalived负载均衡问题排错思考参考
   (1)	iptables问题
   (2)	linux内核转发
   (3)	RS端是否抑制ARP生效,是否绑定了VIP
   (4)	确保RS可访问
   (5)	ipvsam -L -n检查lvs真实服务器情况及VIP设置
   (6)	检查keepalived配置(主从的不同)
   (7)	查看系统日志/var/log/messages